System requirements
You can use any PC you have to hand, as long as it can boot from a USB stick and has at least one (ideally two) network interface cards. Note that the latest and shiniest hardware may not be supported.
Setup

WANulator currently ships with only a web browser as a built-in client, so for transparently testing any kind of client/server application the setup below is recommended (the "server" box can also be a whole network with several components, for example when testing SIP/VoIP applications):
eth0 and eth1 are the old-school Linux names for your first and second network interface; these days a predictable naming scheme is used instead. When you boot the test PC from the WANulator ISO you are presented with the system setup dialog. For the setup above, choose switched mode and select the eth0/eth1 interfaces. The other tabs let you change the keyboard layout and configure the statistics refresh timer. Leaving the setup brings you to the main WANulator window. Before you start building test setups, check that the application you want to test works without problems from your client PC.
Main window
The main window shows a menu bar, a tool bar and an overview of all selected interfaces, to which you can apply the test functions. After initial setup every function slot is empty, so each one shows the NOP symbol:

The top slot configures the interface's bandwidth limit. Only the upstream can be limited, so to simulate typical end-user line speeds you apply a limit on both interfaces. For example, 768 kBit/s on the up-stream of eth0 and 128 kBit/s on the up-stream of eth1 gives you an old-fashioned DSL line. Likewise, every function you assign to a slot applies to that interface's outgoing traffic, and the functions in a slot run from top to bottom in the order you assigned them. To assign a function, pick it from the tool bar and click a free slot; clicking an already-assigned slot opens its configuration dialog, unless you pick the NOP function, which clears the slot. After you assign a function, the main window shows a summary of its parameters together with live statistics (make sure the statistics refresh timer is set to a useful value greater than 0 in the setup tab).
Function configuration dialog
The first part of the dialog controls how the function is applied to the packet stream, so it appears in every function's configuration. The second part sets the parameters specific to that function.
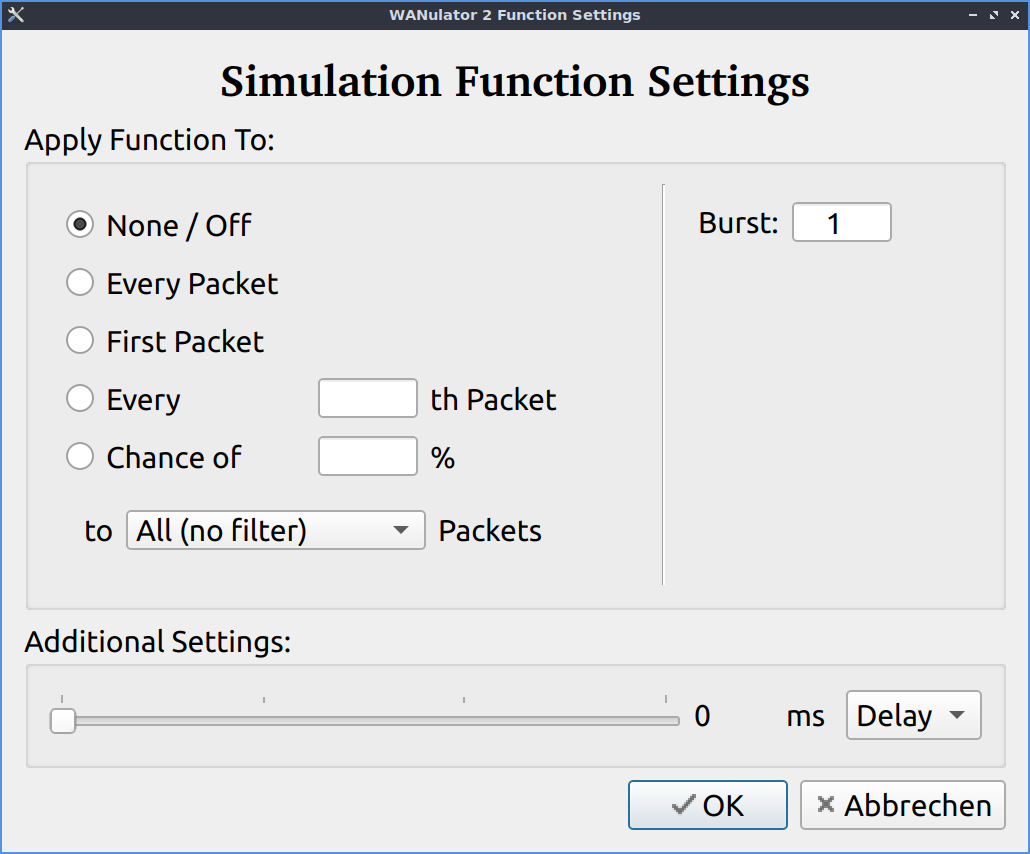
- Filter: choose from predefined protocol filters to apply the function only to a specific packet stream. You can adjust all filter settings in the Edit > Filter menu, and there are 3 user-defined filters you can set up to your needs.
- Chance: the function is applied to the given percentage of packets, chosen at random.
- Static: the function is applied to every nth packet; set the parameter to 1 to apply it to every packet.
- Once: the function is applied only to the first packet.
- Off: the function is switched off.
- Burst: when the function triggers, it also applies to the next n packets (configurable).
For the function-specific parameters, see the function descriptions below.
Function descriptions
- NOP: no operation; clears a slot.
- Delay: delays the packet stream. With a static delay, every packet is held by the given value; with jitter, every packet is held by a random value between 0 and the given value.
- Drop: throws the packet away.
- Dup: duplicates a packet.
- Mix: waits for n packets of the data stream to overtake before the packet is reinserted.
- Scramble: overwrites the contents of the packet with random data, starting from offset len bytes.